How To: Create a Wink Schedule
You’ve purchased a Hub, a few lightbulbs, and maybe even a few other connected products and you’re left thinking; “What’s next?”
While turning products on and off with the tap of a button may be convenient, creating a Wink Schedule makes home automation even easier. Wink Schedules allow users to maintain peace of mind that their devices will operate at a certain time in whatever pattern of days or weeks they choose. Scheduling can also be used to operate your connected devices via Wink’s “Sunrise/Sunset” feature. With a schedule, you will never come into a cold house after work or leave the lights on at bedtime ever again!
Creating a Schedule may seem tricky at first, but we’ll walk you through it in this example. Let’s create a ‘Leave for Work’ Schedule to turn all the lights off at 7:15am.
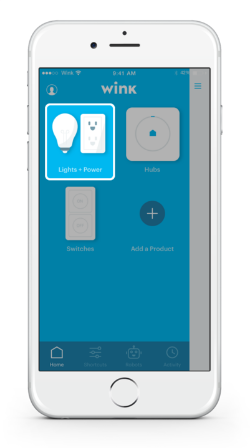
Step 1: From the Wink App home screen, press the ‘Lights and Power’ icon to bring up all of your connected lights.
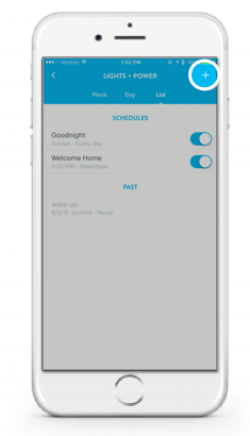
Step 2: Click the gear icon (three blue dots on Android) in the top right corner of the Lights screen. Scroll to the top of the page until you see the ‘Schedule’ button and select it.

Step 3: Press the “+” sign in the upper right corner of the page.
Name your Scheduled Event by typing ‘Leave for Work’ in the ‘New Event’ space.
From this menu, you can also toggle your Wink Schedules on or off as needed.
Step 4:
- For iOS- Tap ‘Start’. From this menu you may select the date and time you’d like the Schedule to fire.
- For Android- Tap ‘Date’ to choose the start date of the schedule. Then tap ‘Time’ to set when you would like the Schedule to fire.
For this example 'Today at 7:15 AM'.


Step 5: Since we want this Schedule to occur every day when we go to work, we are going to click the ‘Repeat’ button on the Schedule setup page. In this menu we will select each day we want the Schedule to occur.
We are going to tap all weekdays in this example to ensure the lights turn off Monday- Friday.

Step 6: Finally, we are going to choose our Schedule action. Select ‘Make this happen’ and you will now see a full list of connected products.

Step 7: Press the product that you are looking to automate and toggle the desired action.
Toggle the light to off by dragging the icon to the left for ‘Off’. Repeat this step for all desired lights.


Step 8: Don’t forget to click Save/Done!

You will now see this schedule appear on your calendar as a blue circle. There will be five other circles on the calendar because you have set the Schedule to trigger Monday through Friday. You can scroll through the Schedule calendar to see any events you have set for the current week or individual day, or click on the List page to see any active Schedules or previously fired Schedules.
I want to turn something off at Sunrise, and back on at Sunset. How do I do that?
Another popular feature involved in scheduling is the Sunrise/Sunset timer. Under the ‘Start’ menu in the Schedule setup page, along with the date and time scroller, you will see an option to select either Sunrise or Sunset for your Schedule time. On Android, this option can be found within the “Time” menu, directly under where you would select the time you’d like your Schedule to fire.
If you would like to turn something on and off with a Schedule, you will create two events. One event will turn the product on, and one will turn the product off.
A great example of this feature is outdoor or porch lighting. A user can create a schedule to turn the porch lights off at sunrise, and back on at sunset. To do this, they will want to create two separate schedules, one for ‘On’ and one for ‘Off’.
Home automation may seem intimidating to a non user, but with the Wink app, creating a smart home is easy! With a plethora of products and tools available within one app, your imagination can run wild. Life can get crazy, but with Wink Schedules there is an easy way to ensure that you and your home are on the same page day in and day out.